Strength Training - A Better Way

This is not your father’s exercise program. There has been a profound revolution in exercise – especially strength training – in recent years. What you learned twenty or thirty years ago turns out to be wrong. Dangerously wrong. Hint: the old “army sit up” is one of the worst things you can do for your back.
I am often asked what asked what are the best exercises. Cardio - running, cycling and fast walking - are an important core to any exercise program. Resistance training is also critically important.
Resistance or Strength training - is physical activity designed to improve muscular fitness by exercising a specific muscle or muscle group against external resistance, including free-weights, weight machines, or your own body weight. The basic principle is to apply a load and overload the muscle so it needs to adapt and get stronger.
And what’s important for everyone to know is that strength training is not just about body builders lifting weights in a gym. Regular strength or resistance training also helps prevent the natural loss of lean muscle mass that comes with aging (the medical term for this loss is sarcopenia). That means it's an important part of your overall fitness and it benefits people of all ages, plus it may be particularly important for people with health issues such as obesity, arthritis, or a heart condition.
Recently I came across an exercise routine from physical trainer Bill Fabrocini, author of several exercise books and consultant to Chris Crawley in his “Thinner This Year” book. What I like about this routine is that it requires minimal equipment, and it combines routines that significantly improve posture and balance - some of the reasons that I routinely recommend Tai Chi and Yoga for many of my patients.
Correct posture (which you probably don’t know about) and a strong core are the secrets of life. The old systems “trained muscles”. The new one “trains movements.” The techniques are fundamentally different. Unless you are burning to be on the cover of Muscle Bound Today, building muscles, not movements, is unhealthy, unproductive - and no fun.
Don’t get me wrong, I still like the machines at the gym and rotate them into my regimen, but this is a new way of looking at resistance exercise that I encourage people to adopt. What follows are the “Twenty-Five Sacred Exercises”. Try to incorporate this workout two to three times per week.
NUMBER 1
Squats
Step 1:
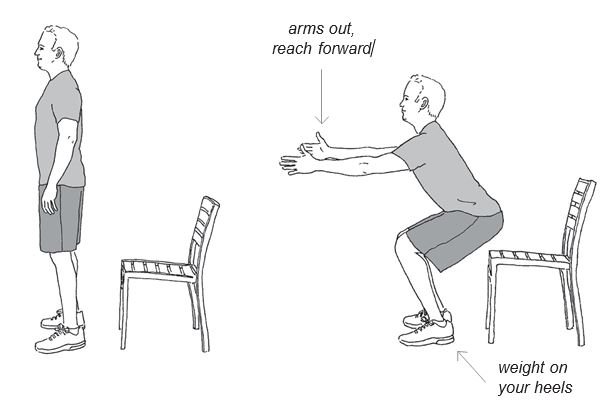
With your core tightened and your back straight, squat down in front of a bench or chair until your butt just touches it, about 18 inches off the ground. Flex your hips and knees; hinge from the hips.
Step 2:
Stand up straight again.
NUMBER 2
Split Squat
Step 1:

Stand with one foot about 18 inches ahead of the other, with your weight more or less evenly balanced. With the front leg, flex the hips and knees; lower your butt until your front thigh is parallel to the floor. Flex your back leg toward the floor.
Step 2:
Ascent: Drive upward with the bias on your front leg. Follow the same instructions regarding posture, making it easier or harder, and so on
NUMBER 3
Single Leg Squat
Step 1:

Standing in front of a bench or chair, lift one foot slightly off the floor. Dip down, bending your knee and hip so that your butt moves back and descends as close as it can to the bench or chair. Note: Very few will be able to do more than a shallow squat. But the goal is the same.
Step 2:
Ascend as before.
NUMBER 4
The Lunge
Step 1:

Stand with your feet in a fairly narrow stance, keeping a neutral spine and good alignment. On the descent, step forward approximately 2 feet (less if you are short) and lower your body as in a squat. Goal: Keep the upper leg parallel to the floor. It may take a while. Do the best you can.
Step 2:
On the ascent, drive up with your hips and knees. Maintain a neutral spine and upright (aligned) posture throughout. You can also do walking lunges—lunge all around the gym.
NUMBER 5
Lateral Lunge
Step 1:

Start with your feet in a fairly narrow stance. Step to one side, as far as you comfortably can, shifting your body weight to the supporting leg (a couple of feet is fine). Keep your feet facing forward, not to the side. Your hips will shift back a bit during the descent.
Step 2:
Push back up, primarily with the laterally placed leg, and return to a narrow stance.
NUMBER 6
Pulldown (with Machine)
Step 1:

Set the weight on a pulldown machine at a light level. Sit down and seize the bar, with your palms facing away and your hands shoulder width apart (arms fully extended overhead). Slowly depress your shoulder blades and pull the bar down all the way to your chest. (Variations: Try a wider or narrower grip; palms facing inward; this may be easier if you have a history of shoulder problems.)
Step 2:
Slowly return bar, until your arms are stretched fully overhead - use controlled movement all the way. Reach at the top of the range. This is a range-of-motion improvement exercise. Feel your way toward a level where doing ten to twelve reps is demanding - impossible, in fact, on the third set.
NUMBER 7
One-Armed Dumbbell Row
Step 1:

Kneel, with one knee on a bench and the other foot on the floor. Lean down to grasp a dumbbell.
Step 2:
With your extended arm grasping the dumbbell, pull your shoulder girdle back, then drive your elbow toward the ceiling. Pull the dumbbell upward, just above the hip.
NUMBER 8
One-Armed Cable Row (Cable Machine)
Step 1:

Set a cable machine with the grip close to the floor. Start with a light weight and feel your way. With one leg forward in a split squat, grasp the handle with the opposite hand; if your left foot is forward, use your right arm. Depress your right shoulder girdle and pull the handle to your side in a single-arm rowing fashion. Pull until your hand is just above your right hip.
Step 2:
Slowly return to starting position. Use controlled movement.
NUMBER 9
Chest Press (Bench)

Step 1:
This is, in effect, a push-up off a bench. Lean over a padded gym bench, arms fully extended and your body rigid. The more vertically you stand, the easier it is to do. Slowly lower yourself until your upper body almost touches the bench.
Step 2:
Push up until your arms are straight again.
NUMBER 10
Single-Arm Dumbbell Press
Step 1:

Lie on your back on a padded gym bench, feet spread wide on the floor. (You may need a box or other “lift” so your low back does not overarch.) Hold a dumbbell in one hand, slightly away from your body, at shoulder height.
Step 2:
Engage your abdominals and depress your shoulder girdle. Push or drive the dumbbell upward, straight over the shoulder, toward the ceiling.
NUMBER 11
Single-Arm Cable Press
Step 1:

Stand at a cable press machine. Anchor the cable at a height midway between your waist and shoulders. Stand in a split-squat position (see Number 2), facing away from the machine. Load the machine appropriately (start light, as always).
Step 2:
The movement is like throwing a punch. If the right leg is forward, take the cable in your left hand (back) at shoulder height. Push or punch forward with the left arm in a horizontal path and shift your weight onto the front foot. Return to starting position by bending your elbow and bringing your hand back to shoulder height.
NUMBER 12
Split-Squat Overhead Press
Step 1:

Assume the descent position of a split squat (see Number 2), with your knee bent, holding a dumbbell at shoulder height. If your right leg is forward, the dumbbell should be in your left hand.
Step 2:
Stay in the split-squat position while thrusting the dumbbell straight overhead. (A little upward thrust from the legs to create momentum is fine.)
Step 3:
Return the dumbbell to your shoulder.
NUMBER 13
Rotation/Chop with Medicine Ball

Step 1:
Start with a light (for you) medicine ball or no weight at all. Stand with your feet shoulder-width apart or slightly wider. Hold the medicine ball out in front of your body, keeping your arms slightly bent. Engage your abdominals. Begin squat position, moving down and to the right, bringing the ball around to the right. Squat and lower the ball as close as you can get it to the floor, without losing the neutral spine. You may not be able to get much past your knees when you start. Your body must move as a unit, facing the ball as you swing it to your right or left. Rotate your hips, not your lower back. Your belly button should follow the ball!
Step 2:
Slowly swing the ball up to your waist and, without pausing, straight around to the left and over your shoulder, as high as you can reach. The ball basically follows a diagonal path, moving from outside your right foot to over your left shoulder, or vice versa. Rotate your hips, not your lower back. Your belly button should follow the ball, same as on the way down. Return to starting position.
NUMBER 14
Rotation/Chop with Cable Machine
Step 1:

Set a cable machine with light weight; set the base near the floor. Stand beside the machine with the handle in both hands, your whole body turned toward the machine. Drop as deeply toward the anchor point of the cable as you can without losing your neutral spine. Let your belly button follow your hands, as with the medicine ball in Number 13.
Step 2:
Raise the handle up to your waist, then—in a single continuous movement—raise the handle up to your left and over your opposite shoulder, as high as you can reach. Maintain a neutral spine. Let your belly button follow your hands.
NUMBER 15
Squat Single-Arm Overhead Press
Step 1:
Start with your feet shoulder-width (or slightly farther) apart, holding dumbbells (one in each hand) at shoulder level, palms facing forward. Descend into a squat position while maintaining a neutral spine; keep your knees in close alignment with your toes.
Step 2:
Once you reach the low point of your squat, forcefully ascend back upward. As momentum builds, drive one arm (holding the dumbbell) directly over your head. Finish by returning your arm and dumbbell to shoulder level.
Step 3:
Repeat squat sequence again, but this time, on the ascent, drive the opposite arm toward the ceiling. Finish by returning your arm to your shoulder in a standing position.

NUMBER 16
Back Step Lunge Row
Step 1:

Set a cable machine with the anchor near the floor, using a modest weight. Stand in a split squat facing the machine. Place your left foot forward, take the cable handle in your right hand, fully extended toward the machine.
Step 2:
Begin by stepping forward with your back (in this case, the right) foot. Do the step by driving upward with the front (or left) leg. Simultaneously, as you lift your body upward, pull your right arm toward your side, just above the hip. Finish standing in a narrow stance, with your right arm by your side, in a “row” position, shoulders back and elbow bent.
Step 3:
Return to the start position by reaching forward with the right arm as you lunge back with your right foot, resuming the original split-squat position.
NUMBER 17
Squat, Arm Curl
Step 1:
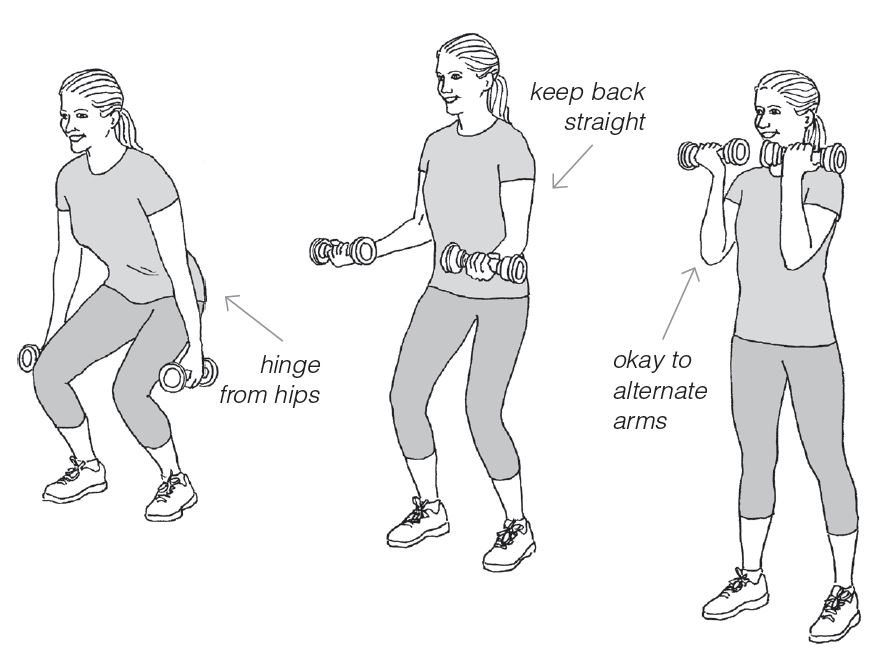
Stand with your feet shoulder-width apart, holding a pair of dumbbells down at your sides. Descend into a squat with your arms extended, dumbbells in hands, moving toward the floor. Palms can be facing forward or inward, whichever is more comfortable. As you rise out of the squat position, curl your arms (from your elbows) so the dumbbells move toward your shoulders. It is okay to use some momentum to swing the weights a bit on this one. But do not let your body buckle from side to side or get out of neutral alignment.
Step 2:
Slowly return the weights to your sides.
NUMBER 18
Bend, Pull, Overhead Press
Step 1:
Bend over and grab two dumbbells off the floor. Remember to hinge from your hips and maintain a neutral spine. The movement of bending over is less of a squat and more of a bend from the hips. Your knees can bend slightly, but the object is to keep them straighter. If you have very tight hamstrings, you may not be able to reach all the way to the floor without rounding your back. In this case, place the dumbbells on a box or other “lift” so you do not have to bend over too far.
Step 2:
Straighten yourself back up while lifting the dumbbells off the floor. Be careful not to round your lower back. Simultaneously pull the dumbbells upward to shoulder height. Without pausing—and using the momentum already created—push the dumbbells directly over your head.
Step 3:
Return the dumbbells to shoulder height; then bend over and reach down with your arms until the dumbbells touch the floor again. Repeat the entire sequence.

NUMBER 19
“I’s” and “T’s” with Dumbbells
Step 1:
Lie on your stomach on a padded bench, keeping your head and chest just slightly off the bench. Hold light dumbbells in both hands. For the “I’s,” lie with your arms at your sides and palms down. For the “T’s,” lie with your thumbs up and your arms out to the sides.
Step 2:
Gently lift your chest slightly off the bench, extending from the mid back, shoulders depressed (not hunched). Do not arch from the low back. Lift both arms (from the floor) to just higher than parallel with your body. Hold for three seconds. Return to start.

NUMBER 20
Rotator Cuff External Rotation with Dumbbell
Step 1:

Lie on your right side with your hands as shown: left or weighted elbow at a 90-degree angle, forearm across your body. Grasp the weight (start very light) and very slowly raise it toward the ceiling.
Step 2:
Lower the weight to starting position, slowly, over a count of four or five. This is very important to build strength.
NUMBER 21
Hip Extension Lift
Step 1:

Lie on your back with your knees at a 90-degree angle and your heels on a chair or Swiss ball. Engage your glutes and abs. Drive your heels down on the bench or ball—keeping your feet flexed—and lift your butt off the floor. Hold for three seconds. Return to starting position.
NUMBER 22
Plank
Step 1:

Lie on your stomach, up on your elbows. Engage your glutes and abs. Depress your shoulders. Lift your butt and knees off the floor. Keep your back and hips level (stiff). Hold for ten seconds. Only do three of these to start, and focus on maintaining the contraction of the core muscles. It is much harder and more effective that way.
NUMBER 23
Side Plank
Step 1:
Lie on your side, up on one elbow. Engage your abs and glutes. Lift your hip and knees off the mat. Hold for ten seconds. Repeat only three times.

NUMBER 24
Crunch
Step 1:

Lie on your back with one knee bent and one hand behind the head, supporting the neck. Lift your shoulders slightly off the floor (about 4 inches) without flexing your neck. Hold for three to five seconds. Relax. Do three sets of ten reps.
NUMBER 25
TRX Rip Trainer “Drag”
Step 1:

Stand at a TRX Rip Trainer or a cable machine, facing the anchor point (at mid-level). Hold the bar in both hands, with your knees slightly bent and your arms straight out, keeping some tension on the bar.
Step 2:
Depress your shoulder blades and pull the bar until it touches your chest. Hold for thirty seconds (up to a minute). Repeat with the cord on the opposite side. To make it more intense, step back farther and increase the resistance.